How to Synchronize your Jira Instances in 5 Steps
Today's post is a guest post brought to you by our partner iDalko, the developers of the synchronization tool for Jira, Exalate.

Nearly everyone depends on software for data management, but very few businesses use it to its full potential. Using the right tools is key, and making sure they work together is just as critical. With different teams working on their own platforms, a software integration solution can help join the dots and let everyone take advantage of the information available.
This is your guide to setting up a Jira to Jira integration with the least fuss possible. So let’s get started!
Why you need to integrate your Jira instances
Different teams often have information that others can make use of. If it isn’t shared, you aren’t making full use of your organization’s collective knowledge.
If they’re using platforms like Jira, this data can be automatically exchanged with others by setting up an integration. Jira issues may be of use in different contexts, and an integration can synchronize your Jira tickets between projects on separate instances. It can also select which fields to share, allowing you to filter the data, so teams only see what they need.
The right technology for aligning teams that are working in multiple Jira instances
The choices you make when setting up your integration are crucial. There are a few things to keep in mind. The integration needs to be reliable, so you make sure that it can handle any outages automatically and will be back up and running afterward.
You also want it to be flexible enough to control what is shared and set the conditions for doing so. That lets you tune it as closely as possible to your requirements.
The teams using it want to be connected but also need to retain their autonomy. They need to be able to independently adjust how they use the data they get and control what is being sent out, and they need to be able to make changes themselves without disrupting the other team.
Exalate was designed with these criteria in mind. It can connect your instances reliably, has the flexibility to do what you need it to, and lets your teams retain their independence.
How to set up an effective Jira sync in five steps
Here’s how to connect multiple Jira instances using Exalate.
Step 1 - Install Exalate on Your Jira Instances
First, you need to install Exalate. You’ll need to do this on each Jira instance, though it is possible to use Exalate to sync projects on the same instance.
Check the documentation for Jira on-premise or Jira cloud, depending on your version.

In Jira Cloud, click the cog in the top right, then click “add-ons.” Look on the left and click “Find new apps.” You’ll see the Atlassian Marketplace. Type “Exalate” in the search field. “Exalate Jira Issue Sync & more” should appear at the top, so click the “Free Trial” button.
Follow the instructions in the popups to install Exalate. Repeat the process on your second instance, and you’re ready to continue.
Step 2 - Connect Your Jira Instances
In the apps menu, look under the “Exalate” heading and click connections. Click the green “Initiate connection” button. A wizard will guide you through several choices.

First, you need to decide if your connection will be public, private, or local. If you’re unsure, here’s more info.

Next, enter the URL of your other instance. After that, more fields will appear. You can name the connection and enter a description, which will come in very handy later if you have multiple connections. It will also help others work out how the connection is used.
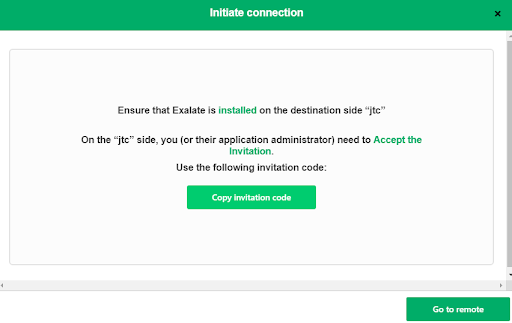
Next, pick a project to use for the synchronization, then click the “Initiate” button. You’ll get an invitation code, which you should copy and paste somewhere safe.
Switch over to your other instance. Find the connections menu, but this time click “Accept invitation.” Then paste in the code you just received. Make your choices in the same way.
If you have admin access to both instances, you’ll be able to use the basic mode (free plan) or the visual mode to set up the connection. They allow you to configure your sync using a simple interface. If not, there’s a script-based option for configuration.

In visual mode, you can apply filters, letting you synchronize tickets that match different criteria. You can also easily choose how fields are mapped onto each other.
Step 3 - Configure Your Connection to Share the Right Data
Once your connection is ready, you can edit what it shares at any time. Find it in the connection list and click its edit icon.

On each side of the connection, you can adjust the incoming sync rules that show how new items on that instance are created or the outgoing sync rules that control what is sent to the other side.
You can add new lines, delete or comment on existing ones, or adjust them. If you adjust them, you can map them to other fields or provide fixed values.
Step 4 - Create Automated Synchronization Triggers
To set the conditions for data exchange, you can create or edit triggers. Click “Create trigger” from the edit connection screen to create a new one.
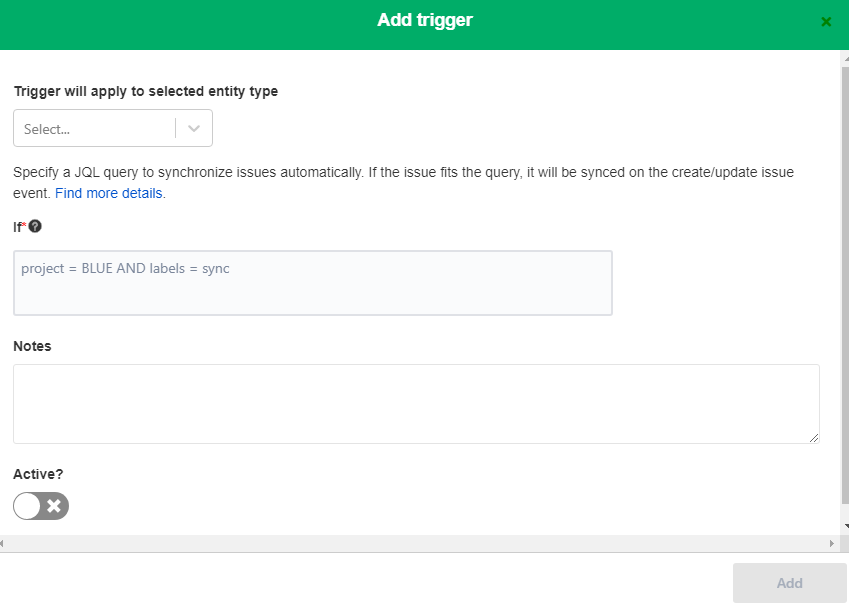
You can choose the entity type the trigger applies to and create rules to pick out the trigger using Java Query Language. Read more about that here. You can add notes to help you remember what the connection is for, too. Don’t forget the “Active” switch.
When you’re ready, click the “Add” button, and you’re good to go.
Step 5 - Start Task Synchronization
Now that your integration is ready, items will be synchronized automatically. If you create items that match your trigger conditions and wait a while, you should see them appear on the other side stating that it is synchronized.
Conclusion
An effective integration can improve the flow of information between your teams and boost everyone’s productivity. With the right solution, your integration can sit in the background, doing its work, while you get on with yours.
As well as Jira, you can also use Exalate for integrating a variety of other platforms like ServiceNow, Zendesk, Azure DevOps, GitHub, and more. It can help your teams work together effectively, with everyone contributing to the group’s overall success.


