Dieses Artikel auf Deutsch lesen
Sales isn’t for everyone. Getting rejected 90% of the time can take a toll on even the most resilient salespeople. On the other side, potential customers tend to dislike salespeople because they see them as trying to sell something that they don’t need.
As a career path, sales requires people to have both the organization and interpersonal skills in order to flourish. In some instances where the sales cycle is longer, relationship building becomes key. As a salesperson, you want to know your potential customers as well as you know your friends or family members. Building that relationship between the salesperson and the customer is key in closing the deal over the long run.
So how can we make building relationships, gathering data, and organizing leads easier? Well for starters we can track the potential customers, their information, and our engagements with them. And how can we do this all in one place where it makes sense? What tools or methodologies do we have available to us to make one of the more difficult jobs, a little bit easier?
Confluence
If your team is already using Confluence, that could be a great place to start tracking your leads. If they aren’t using Confluence, then they can start with a free trial here.
With Confluence, your team can collaborate and share knowledge all in one place using an intuitive and robust editor. Commonly, Confluence is used for product documentation and customer-facing knowledge bases. This allows teams to keep track of their decisions and deflect tickets from customers when a solution is already known to them. On top of this, other teams can use the tool as well. With Confluence’s free version, you can have up to ten users. Otherwise, their per-user pricing is very friendly. If you are certain of how many users you’ll need for a calendar year, you can subscribe for a year and get two months off.
If we were to document our leads on a Confluence page, we might create a page for each lead that we have. We could include some important information at the top of the page and then document any meetings we have with the lead. The page could look something like below.
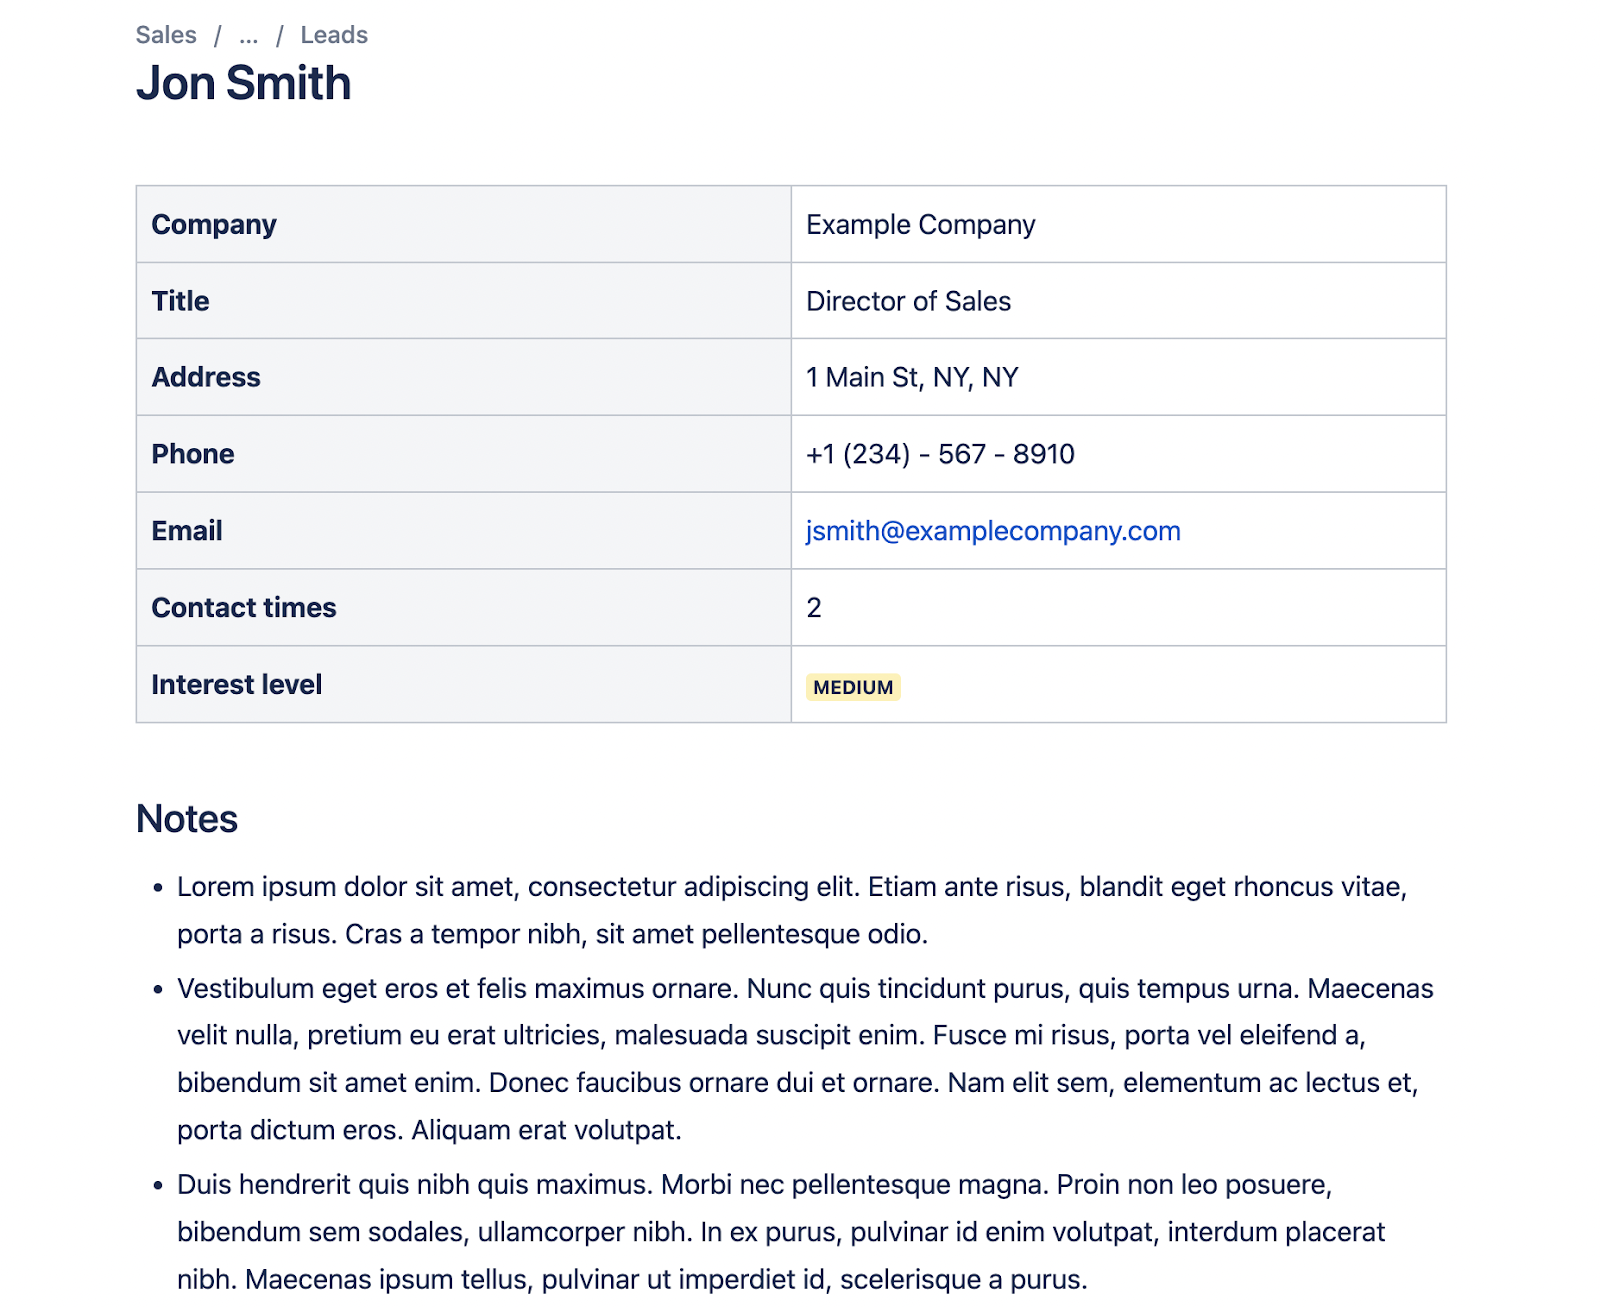
However, Confluence will only take us so far. When it comes to gathering data and organizing it in a practical and easily digestible way, you may fall short with just Confluence. Read on to find out how we can get around this limitation.
Properties - Custom fields, Metadata, Databases, & Reports
Properties - Custom fields, Metadata, Databases, & Reports helps you organize pages in your Confluence instance using forms to collect metadata. Once you have a Properties Group created, you can apply it to a page in order to collect consistent information across your pages. Let’s take a look at our example of documenting leads.
Instead of using the table to gather the information we have on the screenshot above, we can use the Property Group macro. First, we need to set up our Property Group.
Property Groups
The very first step to using this app is to install the Properties - Custom fields, Metadata, Databases, & Reports app on your Confluence instance. In order to install apps in Confluence, you need to have Confluence Administrator permission. If you do not have this permission, please reach out to your Site Administrator. The app is free for the first ten users and is reasonably priced per month or annually based on the number of users.
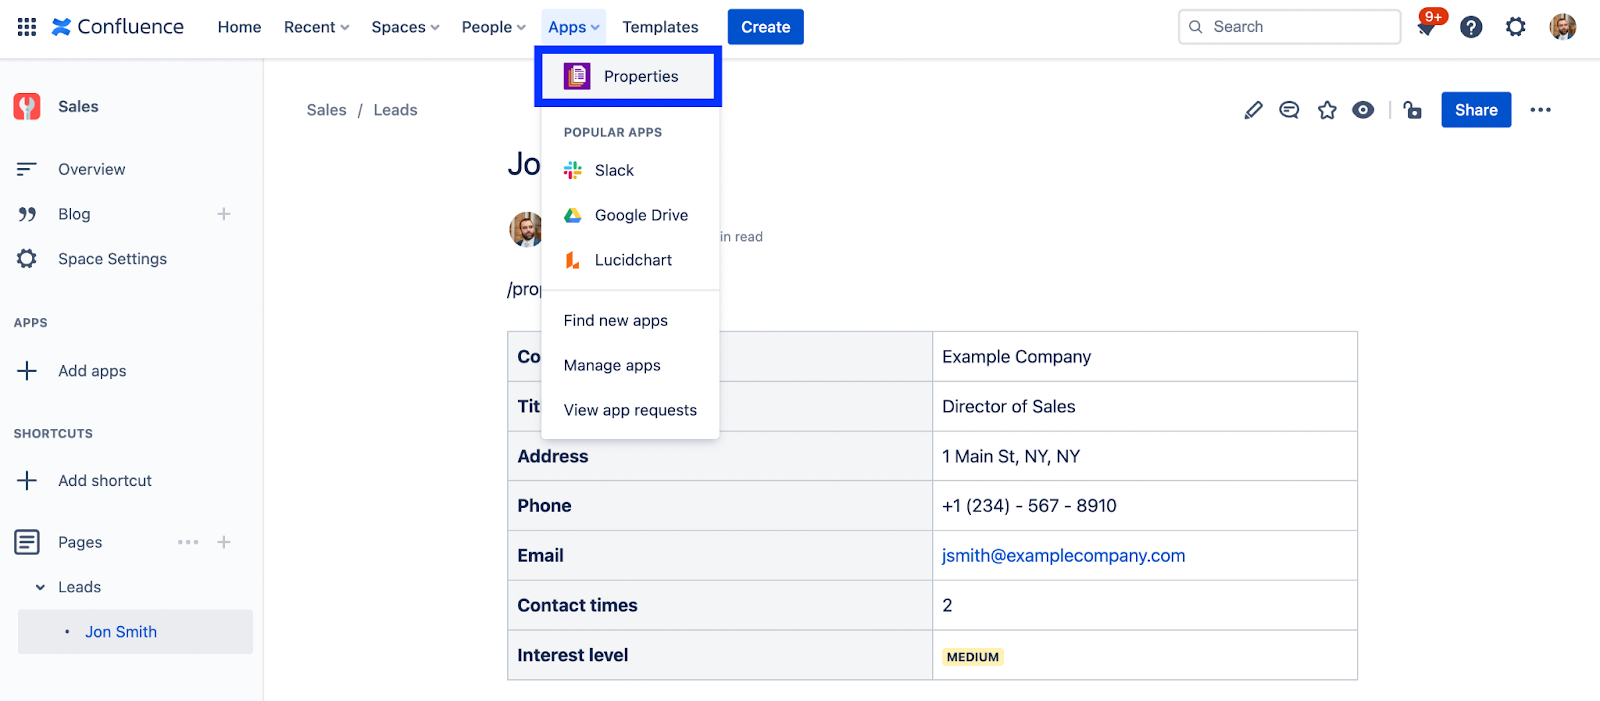
In order to use the Property Group macro, you must set up a Property Group in the Properties Portal. From the top navigation, click “Apps” then “Properties”.
On the left side of the app landing page, you can choose “New property group”. Give your Property Group a name and description, and choose if you want to restrict the Property Group to certain users. You can change this at a later date. Once you are done, you can start adding custom fields to your Property Group by clicking from the options available on the right side.
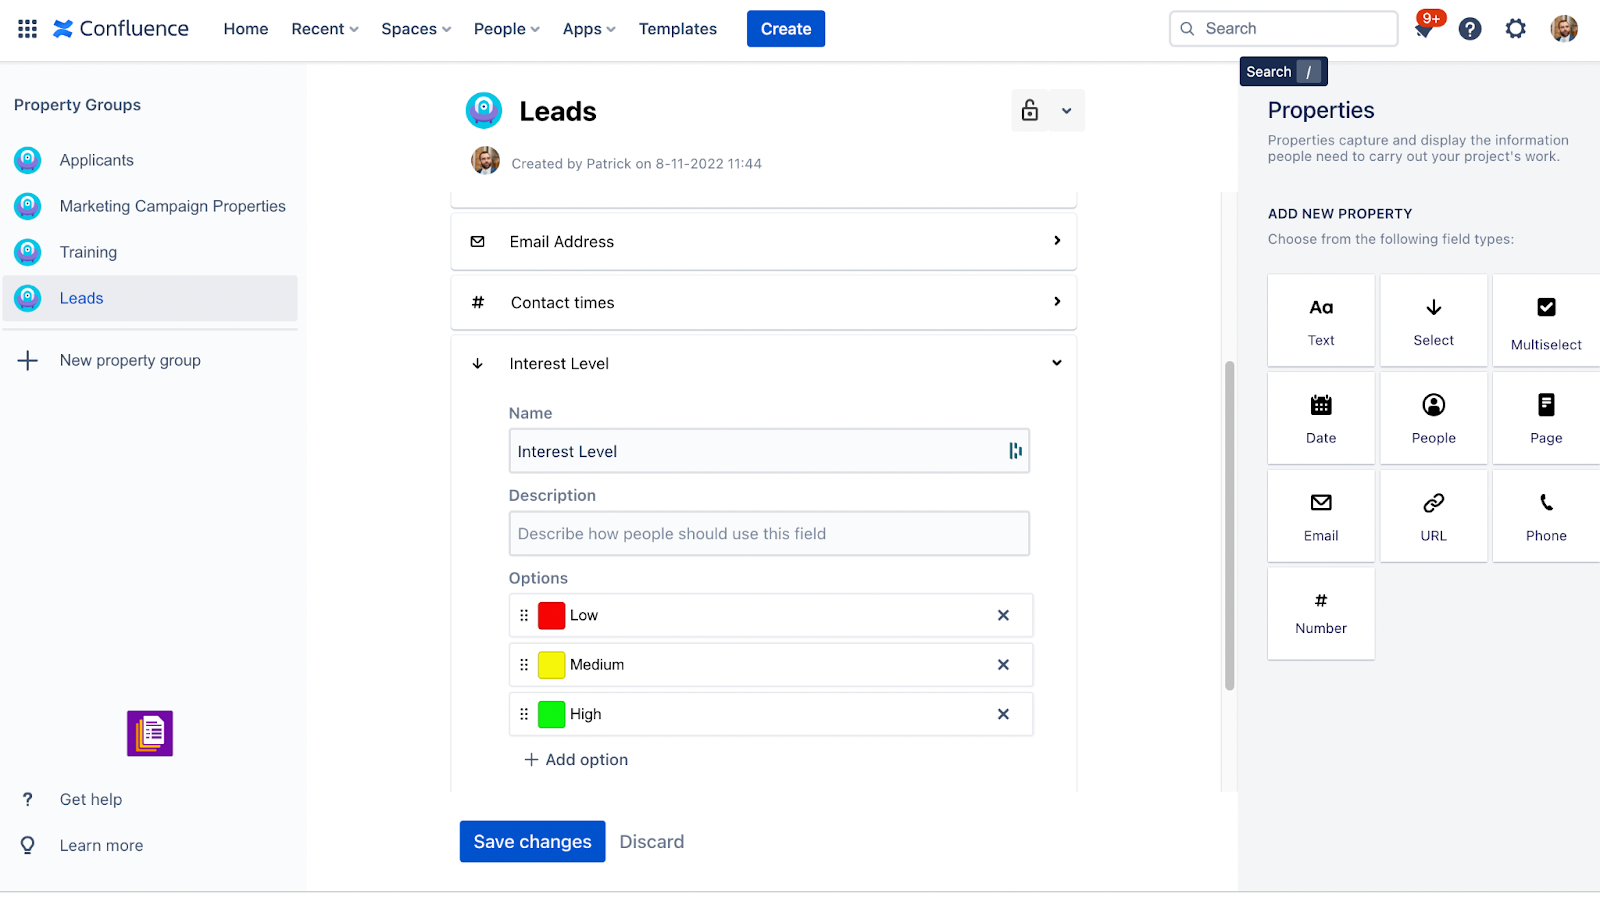
The options shown on the right side above are the options that are available to all subscribers of Properties - Custom fields, Metadata, Databases, & Reports. Most of them are self-explanatory in type, but as you can see above, the select field allows you to customize the colors to make them stand out more. This works well for status select lists or in our case, a select list to gauge the interest of the lead.
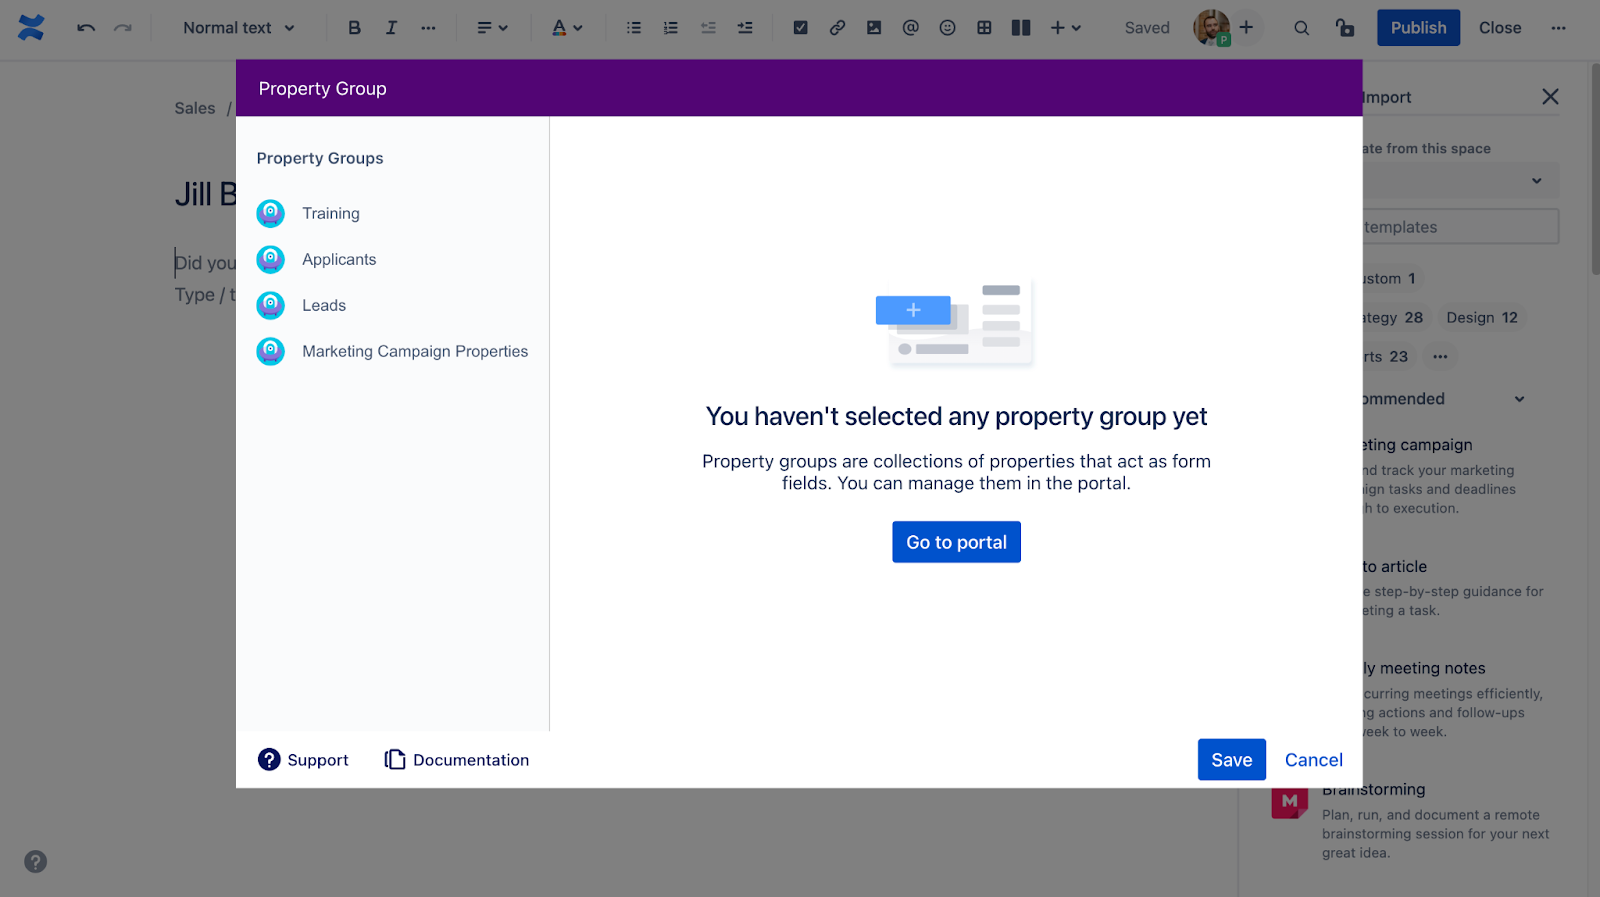
Once we have our Property Group created, we can start to apply it to our pages. In our example of lead gathering, we have one page for each lead. So now, when we create the new lead page, we can add the Property Group macro and select the “Leads” Property Group. To insert the macro just type “/” directly on the page you want to add it to, then start typing “Property Group”.
After, we can select the “Leads” Property Group and enter our information as we see fit.
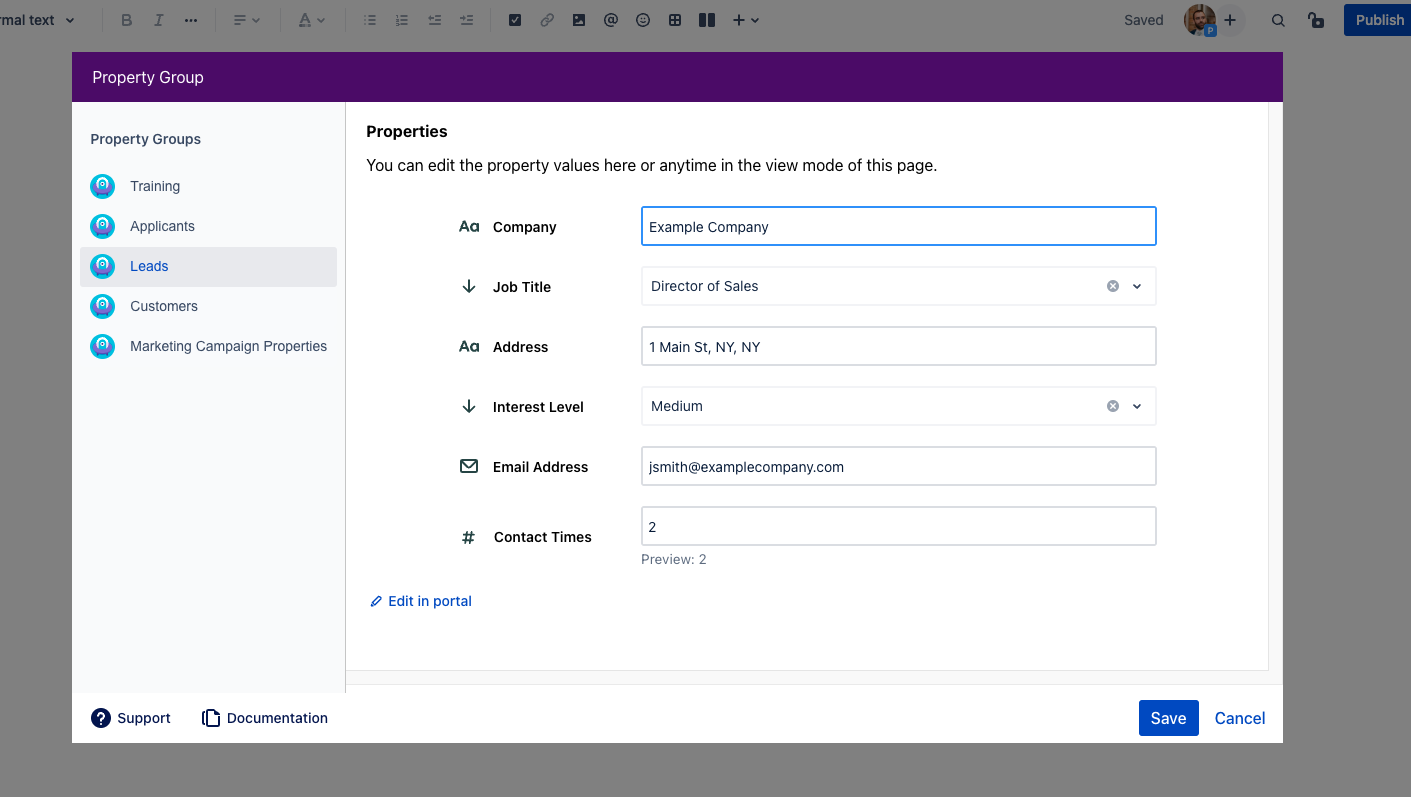
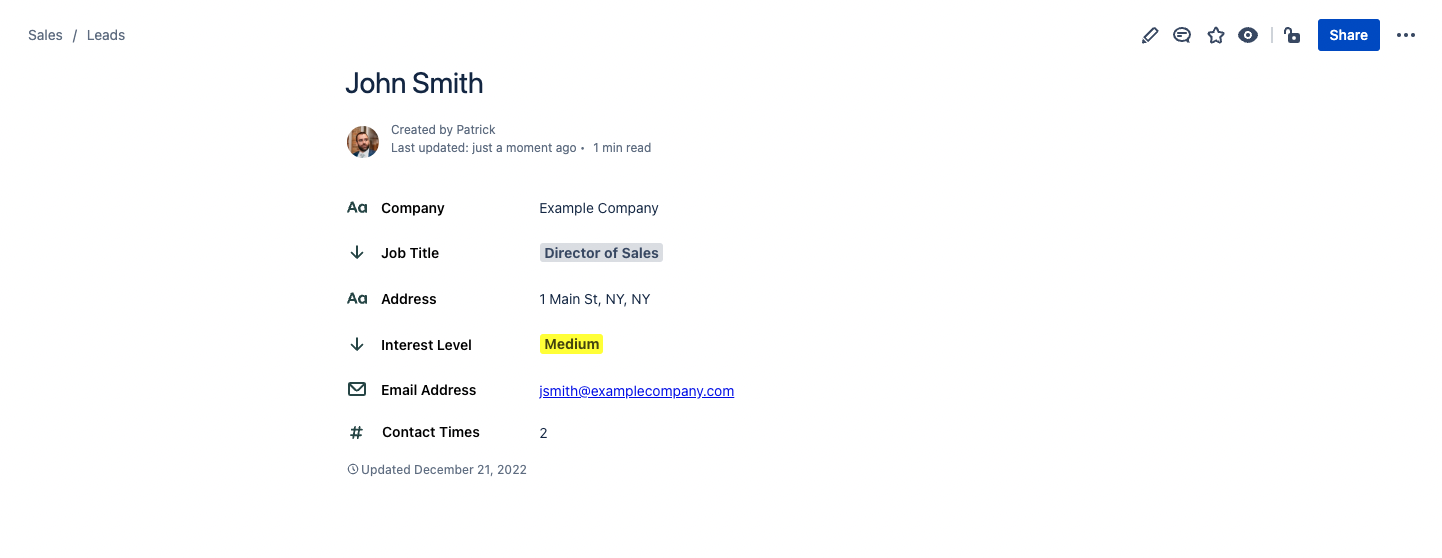
Once you are finished editing your page, you can see the final product of your Property Group, which is much more aesthetically pleasing than the generic Confluence table.
Another great benefit of the Property Group macro is that you can edit it without having to edit the page. This makes maintaining active statuses or lead interest even easier.
Property Group Report
Once we have a few lead pages created, we can use the Property Group Report macro to show a list of all our leads on one page.
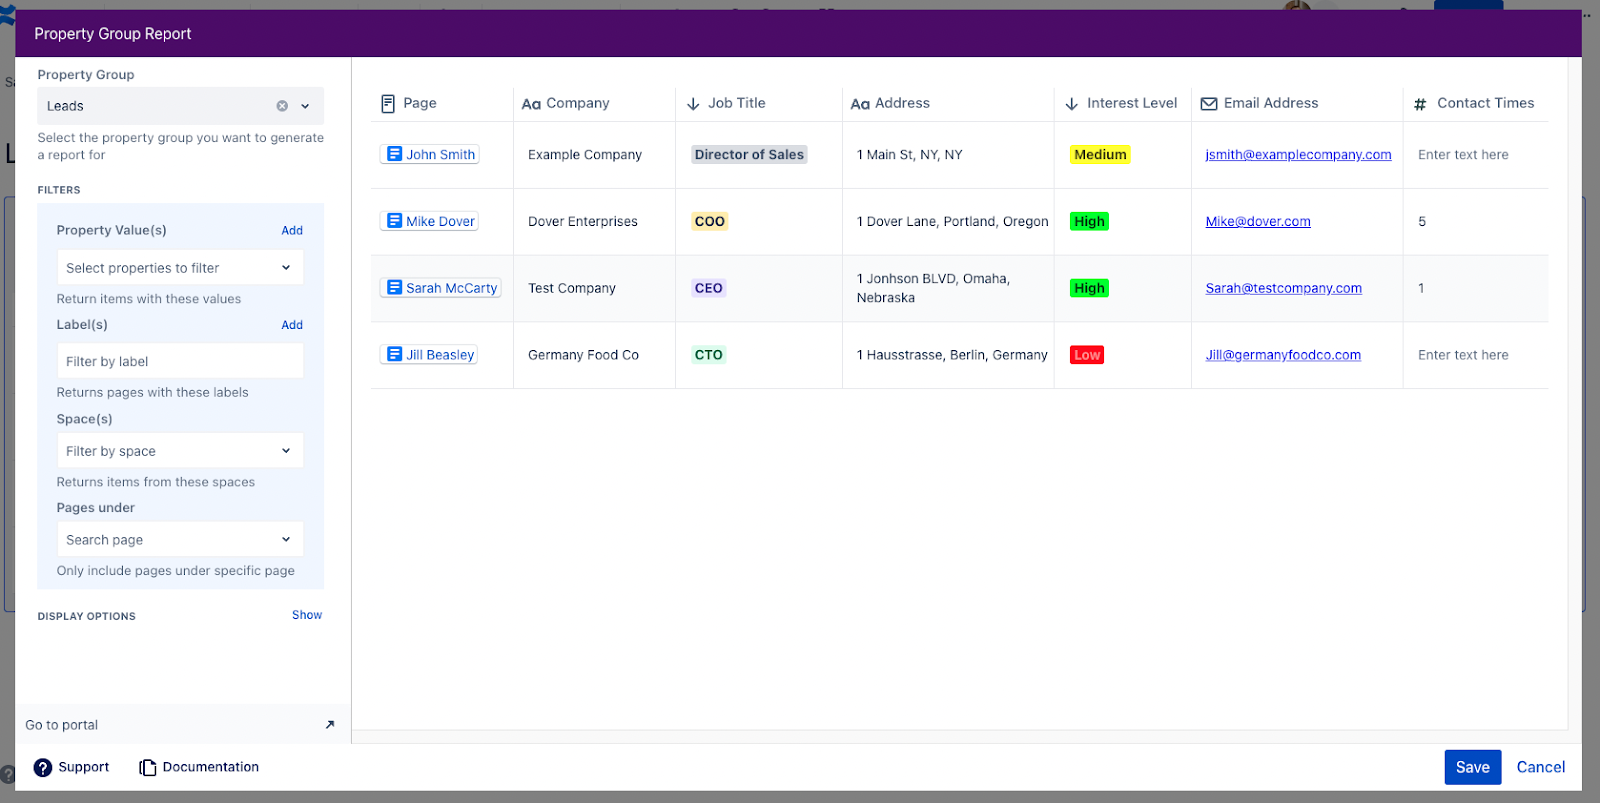
The first and most important part of setting up the Property Group Report macro is to choose the Property Group that you would like to display. This brings in all the Property Group Macros of that type on your site to the report.
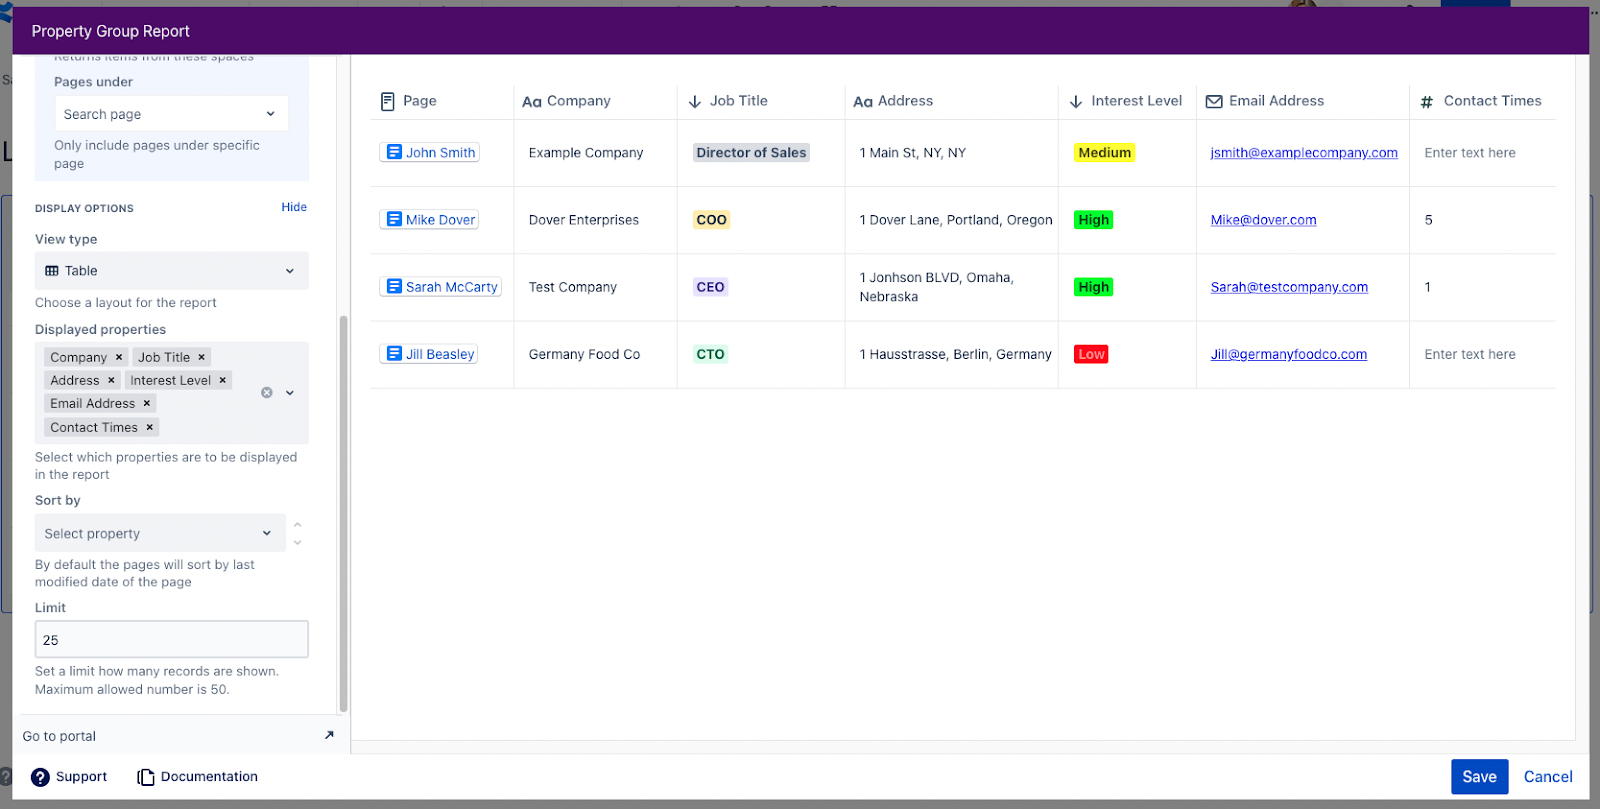
From there, you can filter your result by Property Value, Labels, Space(s), and Pages Under (Page Tree). This ability to filter could help if you have multiple sales teams working with the same Property Group but approaching different client segments.
Finally, we can choose how to display our data. We can use the table or card format. We can also decide which columns to show, how to sort the list, and how many items should display at once.
Let’s take a look at how the final product ended up.
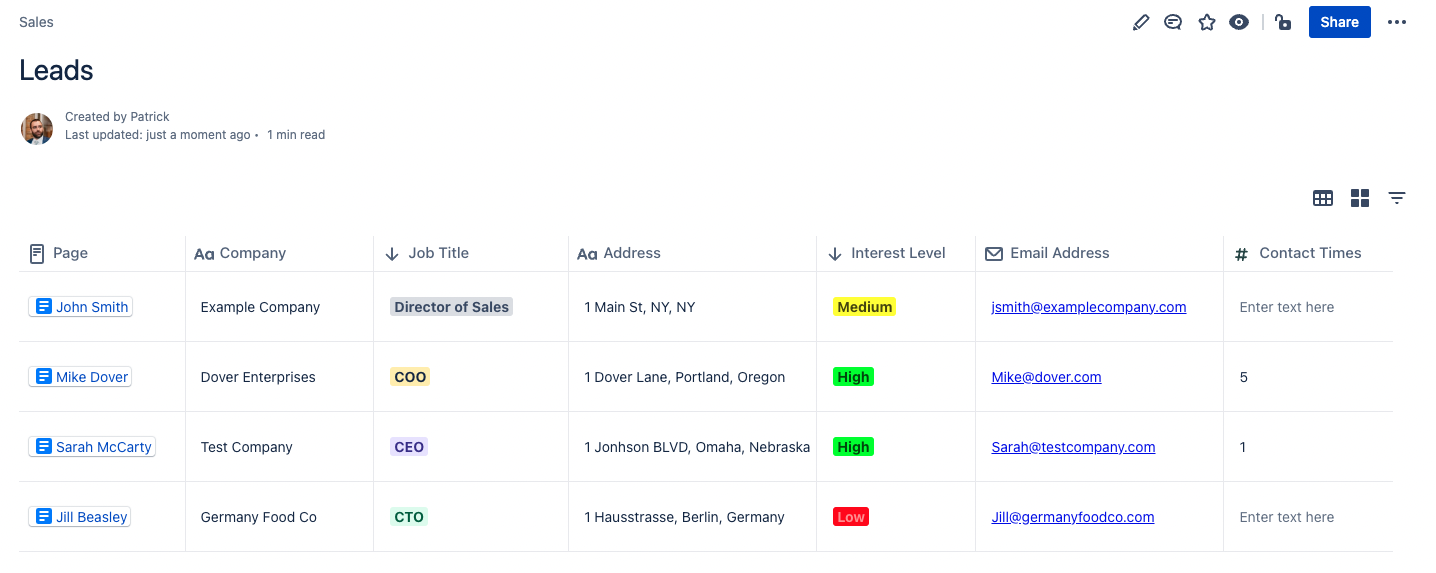
With the Property Group Report macro, we can get a quick overview of all our leads in one place. We can quickly see their interest level, name, company, and other important information to help us make decisions. On top of this, like the Properties Group Macro, we can also change the properties in the report without editing the page. And the best thing about it is that this table is automatically updated when you create a new lead!
Keep your content organized
Properties - Custom fields, Metadata, Databases, & Reports is a must-have app for any team that is collecting and organizing data in Confluence. As you can see from our example above, when you collect leads and have dedicated pages to each lead, utilizing the Properties Group and Properties Group report macro helps to keep your data clean and organized within your Confluence instance.
If you and your team aren’t tracking leads in Confluence, check out some of our other use cases to get inspired. As always, if you need help purchasing, using, or configuring anything in the Properties - Custom fields, Metadata, Databases, & Reports app, please let us know. We are happy to help!
Further Reading
- Keep Your Customer Data in One Place in Confluence Cloud
- Motivate Your Employees and Organize Your Sales Incentive Program
- New eBook: Build a Sales Hub in Confluence Cloud
- How To Build Reports of Your Confluence Pages
- How To get More Insights To Your Projects In Confluence Cloud with Properties


