Diesen Artikel auf Deutsch lesen.
You want to provide your colleagues with the tools they need to get the work done - quickly, efficiently, and with as few headaches as possible. Do they have the hardware and software they need? Do they have access to resources within the organization such as the corporate intranet, email, messaging platform(s), you name it?
And even if they have access to every tool they need, sometimes those tools don’t play nice. Maybe they don’t have the proper access rights to a file share, or their outgoing email isn’t working, maybe that ten year old printer in the Marketing department printer is on the blink, again. On and on, so many issues to keep on top of to keep the wheels in motion.
Time to get one of those expensive and complicated support ticketing systems? For many small to mid-sized companies, those solutions can be out of reach both financially and in relation to the skillsets of your staff. Wouldn’t it be wonderful if there was something simpler, yet allowed you to customize it any way you wanted, and making use of a platform you and your staff are already deeply familiar with? We’ll answer that for you; YES!
If You Build It, They Will…Submit Tickets
Typically, being made aware of issues sooner rather than later, is the way most businesses like to operate. Employee downtime, for whatever reason, can be frustrating and costly for you as the employer as well as the staff you support. Efficiency and collaboration are keys to your success, and that’s one reason among many that you chose to run much of your operation using Atlassian’s Confluence Cloud.
Every organization should have a functional, easy-to-use, and reliable internal support system. A system where staff can easily and quickly create tickets and get the ball rolling with support staff for a resolution. We’d love to show you how Properties - Custom fields, Metadata, Databases & Reports allows you to create individual forms, tickets in this situation, with custom fields for data collection. It then lets you summarize, sort, and list all your tickets via a simple but powerful reporting function. Your staff will be loving life soon again!
Getting Started
You will first need to install the Properties macro (free up to 10 users) to your Confluence instance, and you will need to have Administrative rights to do so. If not, please reach out to your site Administrator.
Once installed, our first step will be to use the app to create the property group which will contain all the fields our staff will use to record the details of their ticket, e.g. Ticket Creator, Assigned To, Status, etc. A property group is a collection of related properties (data fields) you will create. You can have multiple properties per property group, and you can create as many property groups as you’d like for various projects.
From Confluence, click the Apps menu option, search for and select the Properties app to launch it. In the Property Groups portal along the lefthand side, you would see any existing property groups created. As this is our first one, it’ll be blank. You will however see the + New property group option. Go ahead and click it to get started.
You’ll first enter the Name and Description. You can also choose to restrict the usage of this property group to specific users or groups. We simply named ours, “Support Tickets” and gave it a brief description. We wanted to make it available to everyone in our organization, so we left the Restrictions option unused.
Creating Your Properties
Now comes the creation of your properties. You’ll see on the righthand side of the portal the seven property types available. We won’t be using every one in our example, but these are the properties to be created along with their types;
- Ticket Creator | Who is submitting this ticket | property type: People
- As this is tied to your Confluence instance, you will be able to search through the directory of your colleagues who are also using Confluence.
- Assigned To | Who is assigned to resolve this ticket | property type: People
- Similar to Ticket Creator, you will be able to search through the directory of your colleagues.
- Short Description | A summary of the issue(s)| property type: Text
- Here the user can detail the relevant issues they are experiencing.
- Date Created | Date ticket created, defaults to current day | property type: Date
- Due Date | Deadline (if any) ticket should be resolved | property type: Date
- If needed, set the date the ticket needs to be resolved. Can also set the option to highlight the date in the property group if the date has expired.
- Category | Users can choose one or more issue categories | property type: Multiselect
- Users can indicate what support categories are involved such as Equipment, Software Application, Network, etc.
- Related FAQ | Link to existing FAQ’s | property type: Page
If an existing Confluence page exists addressing this issue, it can be linked here. - Status | Select the current status of the ticket | property type: Select
- Dropdown pre-defined list where the ticket can be updated regarding its status of resolution.
Once we’ve added all of the properties to the group, we hit Save Changes and it’s ready to be used within the Confluence page we’ll create next for staff to use to submit their tickets.
Creating Your Confluence Page
Our next step is to create the Confluence Page where we will place our new Support Tickets property group.
Create a new page as you normally would in Confluence. You can name it whatever you’d like. We called ours Support Ticket MASTER. One additional step you’ll want to take, just to ensure no one accidentally modifies this page, is to modify the permissions. We do this so that everyone on your team can view the page and copy it to create their own tickets, but the original page is left untouched for others to use.
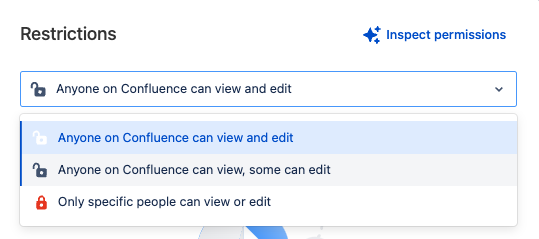
In the top right hand corner of your page near the Share button, you’ll see a lock icon. Click it and from the window presented, choose “Anyone on Confluence can view, some can edit”. It will default to adding you as the page creator as the only editor. You can additional editors if you’d like, however setting the default permissions so others can only view it will save possible headaches down the road from accidental changes. When set as you’d like, click Apply.
As you’ll see in the image below, we added a few lines with instructions at the top of the body of the page to help guide our users. Directly below those instructions, we’ll place our cursor and click the Insert menu option to call the Property Group macro. In a new window, we see all the property groups created along the lefthand column. We find our Support Tickets property group, select it, and click the Save button in the bottom right to insert it. Now that it’s in place, we click the Publish button and our page is ready for use!
You Want Tickets, You’ve Got Tickets!
Now that we’ve created our Support Tickets property group, embedded it in our template page, it’s time to let our staff know the good news, and most importantly, how to use it.
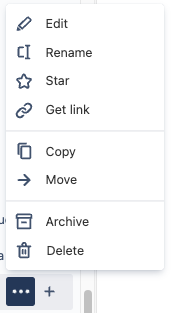
Within Confluence, using the page navigation pane located along the left side, users simply scroll down to find your Support Ticket MASTER page. Placing their cursor over it, an ellipsis (...) appears. Simply click it to reveal the menu options and choose the Copy option.
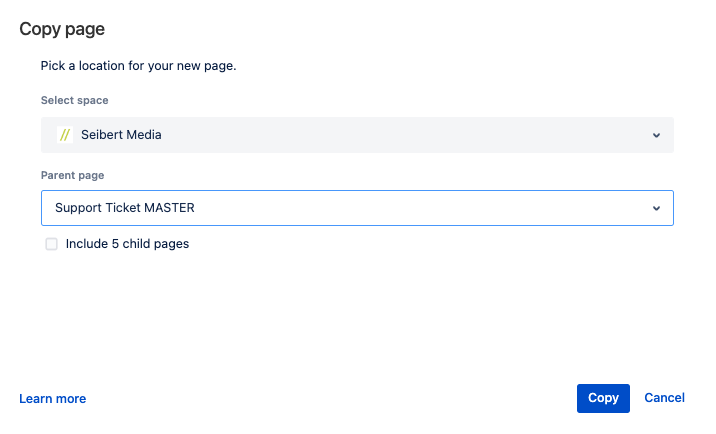
From the Copy page window that’s presented, the current space is selected by default. You can leave that as is. For the Parent page, we’d suggest instructing users to place it under the Support Ticket MASTER you built to keep everything organized. Then click Copy and the user is whisked to this new page.
All they need to do now is change the name of the page to reflect the issue they’d like to report, then click the Publish button. At that point, the property group embedded in the page is active and just waiting for them to complete it. For consistency's sake, instruct them to complete the Short Description property to match the name of the page itself. Once done, they can close the page and it’s automatically added to the queue of support tickets.
As your staff makes use of this property group, tickets will start automatically adding to your support team’s queue. They’ll be so happy! If there was a sarcasm font, we would’ve used it there.
Want to make them even happier? You can give them a report which lists all the tickets in the queue they can reference, as well as sort, filter, and update at any time. Let’s see how that’s done now.
Your Property Group Report - Just A Few Button Clicks Away
We will now call on the Property Group Report macro included with the Properties app. Create a new Confluence Page, name it something like “Support Ticket Report”. Then click in the body of the page and click the Insert menu option, search for and select the Property Group Report macro.
In the portal window that opens, in the lefthand column in the Property Group dropdown, scroll to find your Support Tickets property group. Once you do, you’ll see your property group is shown in the main window area with all the property fields shown. For our purposes, we don’t need every field shown in that table view. Why you might ask? Well, once the report is published, you can scroll through the list of support tickets and simply click on the one you want and the pull page will open in a new window where you can see the full details. Slick, right?!
In our case, under Display Options, we unchecked one of our longer text property fields, Related FAQ (if any), as it would take up a lot of room in our table. And on that note, you can display your properties in either the default Table view or Card. We chose to keep the Table view. You’ll see you can also filter extensively by Property Values, Labels (page labels), Spaces, or Pages. As you make changes to the Filters and Display Options, those will be reflected in the preview window. When you have the report just like you want it, click Save and it’s embedded in your page.
With all that done, now back in our page view, we chose to expand the width to full page to let the table view and all columns be easily viewed. Click Publish and your page is ready to use. Yet another great feature is once your page is “live”, you can sort the report by clicking the column headers. And to top that off, you can click on the property fields themselves to edit them directly there without having to necessarily click the Page name to open the full page. You do have that option as well but for quick editing access, you can do it all right there in the report!
Get Started On Your Next Project
Anxious to get started using Properties for your own support ticket creation, or whatever projects you might have in mind? Head over to the Atlassian Marketplace to install the app. Want to dive in deeper to learn more? We’d love to hear from you - feel free to drop us a note at support@junovi.net!
We think you’re going to love all you can do with Properties - Custom fields, Metadata, Databases & Reports!
Further Reading
- 7 Tips To Get Your ITSM Teams Ready for On-call
- ITSM, ITIL and DevOps: What’s What?
- Why Outsourcing First-level Support Can Make Everyone Happy in the End
- Simplify your Offboarding Processes with Templating.app – Easy Issues & Subtasks
- Keep Your Customer Data in One Place in Confluence Cloud
- Build Your Internal Processes in Jira Cloud with Easy Issue Templates


